

Excel is everywhere—schools, colleges, offices, and training centers all depend on it. One of the most common tasks people struggle with is using the pass fail formula in Excel correctly. It looks simple, but small mistakes can lead to wrong results and confusion later.
Whether you are a teacher checking marks, an HR executive reviewing test scores, or a student learning Excel basics, understanding pass and fail logic clearly can save time and effort. Let’s break it down in a practical, real-world way.
Table of Contents
ToggleUnderstanding the Basics of Pass Fail Formula in Excel
What Does Pass or Fail Mean in Excel Calculations?
In Excel, “pass” or “fail” is not a built-in feature. It is simply a logical condition. For example, if marks are 40 or above, the result is Pass; otherwise, it is Fail. Excel checks this condition and returns a result.
This logic works not only for marks but also for performance reviews, compliance checks, attendance tracking, and more. Therefore, learning the basics once helps in many situations.
The Role of IF Function in Pass Fail Formula
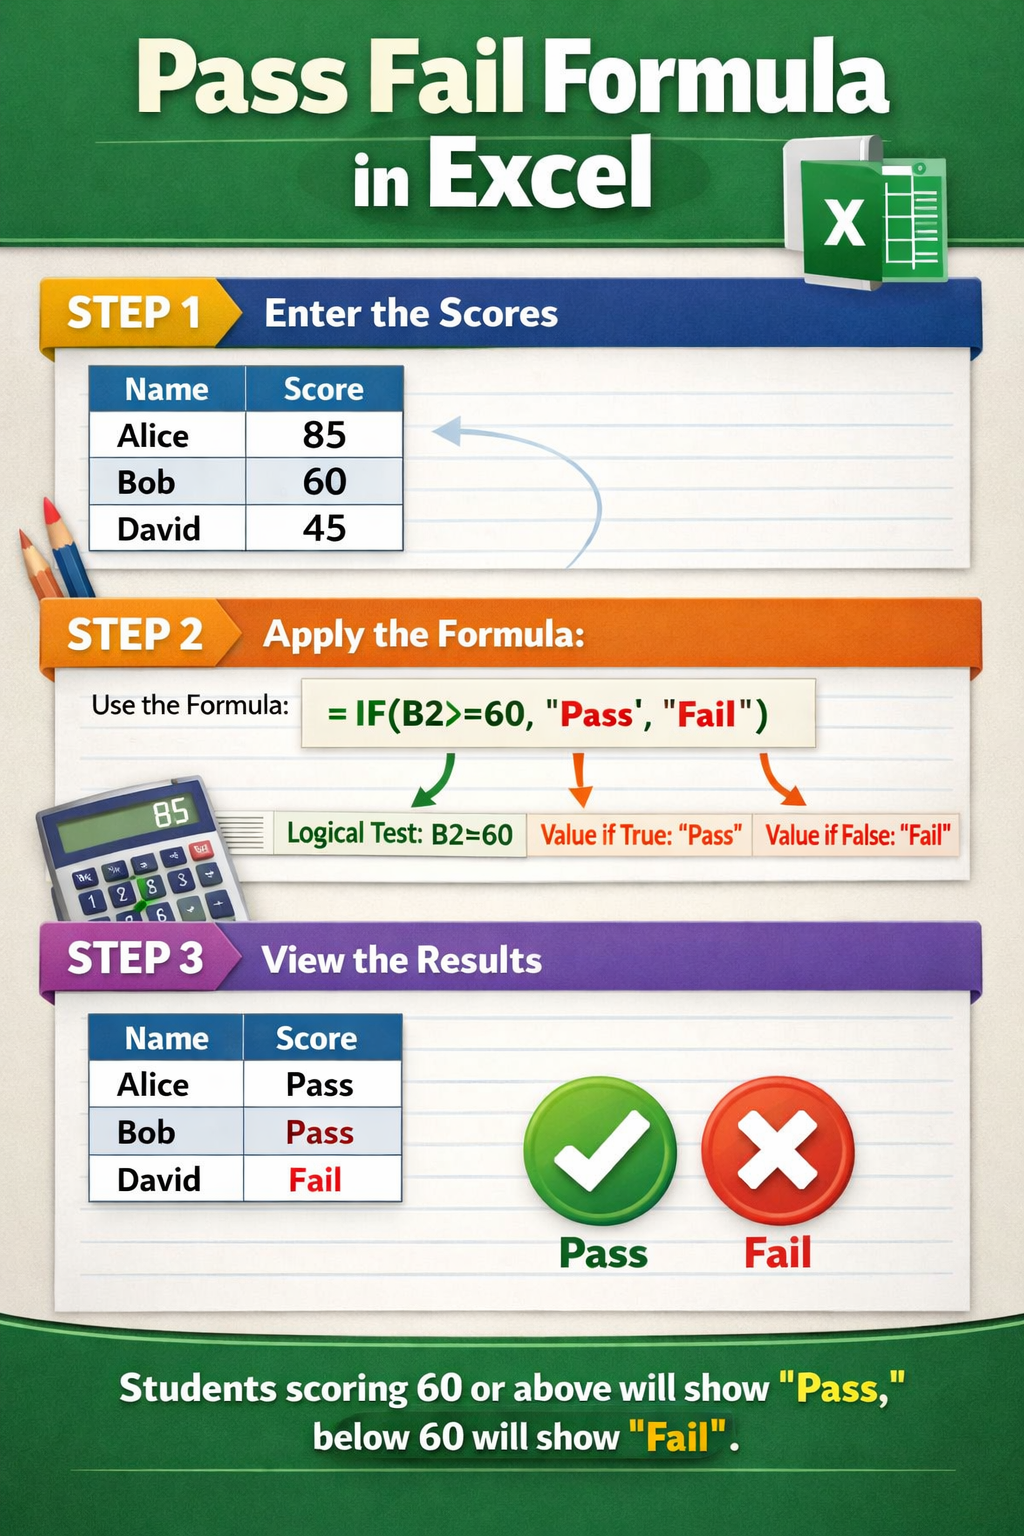
The most commonly used function for pass fail calculation is the IF function. It works like this:
If a condition is true, Excel shows one result.
If the condition is false, Excel shows another result.
For example, if a student scores 55 and the passing marks are 40, Excel returns “Pass”. However, if the score is 35, it returns “Fail”. This simple logic is the foundation of every Excel result formula.
Basic Syntax Explained Simply
The structure looks like this:
IF(condition, value_if_true, value_if_false)
Once this structure is clear, writing a pass fail formula in Excel becomes easy. Moreover, it helps avoid common errors like incorrect comparisons or wrong cell references.
Simple Pass Fail Formula in Excel for Students’ Marks
Using IF Formula for Single Subject Marks
This is the most common real-life use. Suppose marks are in cell A2, and passing marks are 40. The formula will check if A2 is greater than or equal to 40.
If the condition matches, Excel shows “Pass”. Otherwise, it shows “Fail”. This method is perfect for school exams, internal tests, and online assessments.
Moreover, it works well when you are dealing with hundreds of rows at once. Just drag the formula down, and Excel calculates results instantly.
Fixing Passing Marks with Absolute Cell Reference
Sometimes, passing marks are stored in another cell, say B1. In that case, you should lock the cell using absolute reference. This ensures the formula does not change when copied.
This method is especially useful for teachers preparing large result sheets. As a result, mistakes reduce, and consistency improves.
Adding Custom Text Instead of Pass or Fail
Excel allows flexibility. Instead of “Pass” and “Fail”, you can display “Qualified / Not Qualified” or “Eligible / Not Eligible”. This is helpful for competitive exams, interviews, and internal evaluations.
Therefore, the same pass fail formula in Excel can adapt to different professional needs.
Pass Fail Formula in Excel with Multiple Conditions
Using AND Function for More Than One Rule
Sometimes, passing depends on more than one condition. For example, a student must score at least 40 in theory and 35 in practical.
Here, Excel needs to check both conditions at the same time. The AND function helps in such cases. If both conditions are true, the result is Pass. Otherwise, it becomes Fail.
This approach is widely used in universities, certification programs, and skill-based assessments.
Using OR Function for Flexible Passing Criteria
In some cases, passing any one condition is enough. For example, either internal marks or final marks should be above a certain limit.
The OR function checks this logic. If any condition is met, Excel marks it as Pass. Otherwise, it shows Fail.
However, it is important to define rules clearly. Otherwise, results may look correct but fail policy checks later.
Combining IF, AND, and OR for Advanced Results
Advanced result sheets often combine IF, AND, and OR functions. While this may look complex at first, breaking it into steps makes it manageable.
Moreover, these combinations help automate decision-making. As a result, manual checking becomes unnecessary and error-free.
Pass Fail Formula in Excel Using Percentage and Grade Logic
Calculating Pass Fail Based on Percentage
Many institutions use percentage instead of raw marks. First, Excel calculates the percentage. Then, the pass fail formula checks whether the percentage meets the minimum requirement.
For example, if the passing percentage is 33%, Excel compares the calculated value and displays the result accordingly. This approach is common in board exams and competitive tests.
Adding Grade Along with Pass Fail Result
Sometimes, pass fail alone is not enough. Teachers also want grades like A, B, or C. Excel allows nested IF formulas to handle this.
First, Excel checks if the student has passed. Then, it assigns grades based on score ranges. This method keeps everything in one place and reduces extra columns.
Real-Life Use Case: Training and Certification Programs
Corporate training programs often use this logic. Employees must score a minimum percentage to pass, and higher scores unlock certifications.
Therefore, learning percentage-based pass fail formula in Excel is useful beyond academics as well.
Common Errors and Best Practices for Pass Fail Formula in Excel
Mistakes People Often Make
One common error is using wrong comparison operators, such as “>” instead of “>=”. This small mistake can wrongly mark borderline students as Fail.
Another issue is text formatting. Excel treats text differently from numbers, so extra spaces or incorrect cell formats can cause errors.
Best Practices to Avoid Errors
Always double-check passing criteria before applying formulas. Moreover, test the formula on sample values like highest, lowest, and borderline marks.
Using helper columns for calculations can also make formulas easier to understand and audit later.
Keeping Result Sheets Clean and Professional
Clear column names, consistent formatting, and simple formulas make result sheets easy to review. This is especially important when files are shared with management, parents, or auditors.
As a result, your Excel sheets look professional and trustworthy.
FAQs: Pass Fail Formula in Excel
How do I apply a pass fail formula in Excel for minimum marks?
Use the IF function with a condition checking minimum marks. If marks are equal to or above the passing value, Excel shows Pass. Otherwise, it shows Fail. This method works well for exams, tests, and assessments.
Can I use pass fail formula in Excel without IF function?
Yes, but IF is the simplest option. Advanced users sometimes use logical formulas or conditional formatting. However, for clarity and accuracy, IF remains the most reliable approach.
How to calculate pass fail in Excel using percentage?
First, calculate the percentage using total marks. Then, apply an IF condition comparing the percentage with the passing percentage. This method is widely used in schools and colleges.
How do I show Pass, Fail, or Absent in Excel?
Use a nested IF formula. First, check if the cell is blank or marked absent. Then, apply the pass fail condition. This helps manage attendance-based evaluations smoothly.
What is the best pass fail formula in Excel for multiple subjects?
Use the AND function inside IF. This ensures all subject conditions are met before showing Pass. If any subject fails, Excel marks the result as Fail automatically.
Can Excel highlight pass and fail automatically?
Yes, using conditional formatting. You can set rules to highlight Pass in green and Fail in red. This improves readability and quick analysis.
Is pass fail formula in Excel useful for office work?
Absolutely. It is commonly used in performance reviews, compliance checks, training evaluations, and eligibility screening in offices.
Final Thoughts
Mastering the pass fail formula in Excel is a small skill with big benefits. It saves time, reduces manual errors, and brings clarity to decision-making. Once you understand the logic, you can apply it to marks, percentages, grades, or even workplace evaluations.
If you regularly work with Excel sheets, practicing these formulas will make your work faster and more professional. Start simple, test your logic, and build from there. Over time, Excel becomes less of a tool and more of a reliable assistant in your daily tasks.